[PHP] オンラインカード決済サービスStripe Elementの使い方
Stripeは、トークンにして画面に入力されたクレジットカード情報を安全にサーバーへ送信する
トークン化の方法は、Elementsの使用、Checkoutという2つの方法がある
Elementsは、Stripeから提供されるUIを使って自分でカード情報入力フォームを作る
Checkoutは、Stripeから提供される支払いフォームを使う(古いバージョンとBeta版という新しいバージョンがある)
Checkoutの使用方法は下記記事を参照下さい
![[PHP] オンライン決済Stripeの新バージョンBeta版 Checkoutの使い方](https://agohack.com/wp/wp-content/uploads/2019/05/stripe_opg-100x100.png)
* Stripe アカウントを持っていて、 API Key 取得済みであることを前提としている
支払い画面の作成
注意事項
HTTPS 化必須
全てのデバイスで3D Secure決済を使う(3D Secureできるカードの使用)ために、width=device-widthをviewportメタタグに記述すること
<meta name="viewport" content="width=device-width, initial-scale=1" />StripeJS の設置
読み込む
<script src="https://js.stripe.com/v3/"></script>* これをコピーして自サーバーに置くとかは不可。いつも js.stripe.com からロードすること
* 詐欺などを防ぐためには、全てのページ(決済ページ以外)にこのスクリプトを置くことが望ましい
決済ページの作成
HTML (支払い画面となるファイル)に記述する
<form action="/hoge" method="post" id="payment-form">
  <div class="form-row">
    <label for="card-element">
      クレジット または デビットカード
    </label>
    <div id="card-element">
      <!-- A Stripe Element will be inserted here. -->
    </div>
    <!-- Used to display Element errors. -->
    <div id="card-errors" role="alert"></div>
  </div>
  <button>支払う</button>
</form>
JavaScript の記述Elements のインスタンスと Stripe が持っている要素(支払いフォームの部品)を生成し、上記 HTML ファイルに記述した要素と紐付ける
// Elementsのインスタンスを生成
var stripe = Stripe('publishable API key');
var elements = stripe.elements();
// Custom styling can be passed to options when creating an Element.
// CSSの記述
var style = {
  base: {
    // Add your base input styles here. For example:
    fontSize: '16px',
    color: "#32325d",
  }
};
// Create an instance of the card Element.
// カード要素のインスタンス生成
var card = elements.create('card', {style: style});
// Add an instance of the card Element into the `card-element` <div>.
// id="card-element"の<div>タグにカード要素のインスタンスを紐付ける(mountする)
card.mount('#card-element');
* localeはデフォルトでブラウザと同じになっている(表示される言語とかに影響)。stripe.elements()の中で、任意のlocaleに設定可能
CSSオプションはココ
CSSでなんかしないとかなり簡素なフォームとなる

Stripe 要素は入力値の型チェック(バリデーション)を行うため、 'change’ イベントでエラーを拾って表示すること
card.addEventListener('change', function(event) {
  var displayError = document.getElementById('card-errors');
  if (event.error) {
    displayError.textContent = event.error.message;
  } else {
    displayError.textContent = '';
  }
});
安全にカード情報を送信するためのトークンを生成
ユーザーが入力したカード情報は、トークンに変換してサブミットする(サブミット直前のイベントリスナーでトークンを生成する)
// Create a token or display an error when the form is submitted.
// トークンの生成、またはサブミット時のエラーを表示
var form = document.getElementById('payment-form');
form.addEventListener('submit', function(event) {
  event.preventDefault();
  stripe.createToken(card).then(function(result) {
    if (result.error) {
      // Inform the customer that there was an error.
      // エラーがあった場合、エラーを表示
      var errorElement = document.getElementById('card-errors');
      errorElement.textContent = result.error.message;
    } else {
      // Send the token to your server.
      // エラーがない場合、トークン送信
      stripeTokenHandler(result.token);
    }
  });
});
stripe.createToken(card) について
createToken() を呼んで、カード情報を渡す
createToken() は、第二引数に氏名や郵便番号などの情報を渡すことができる
ココを参照
トークンと form データを送信
トークンとフォームデータを PHP に送信するJavaScript の記述
function stripeTokenHandler(token) {
  // Insert the token ID into the form so it gets submitted to the server
  // トークンIDを付加してフォームデータをサブミット
  var form = document.getElementById('payment-form');
  var hiddenInput = document.createElement('input');
  hiddenInput.setAttribute('type', 'hidden');
  hiddenInput.setAttribute('name', 'stripeToken');
  hiddenInput.setAttribute('value', token.id);
  form.appendChild(hiddenInput);
  // サブミット
  form.submit();
}
決済処理( PHP 側の処理)
ライブラリをインストールする
インストールは2通りあるので下記記事を参照されたし
// Stripeライブラリの読み込み(インストール方法によって記述が変わるので注意)
require_once('vendor/autoload.php');
// Set your secret key: remember to change this to your live secret key in production
// See your keys here: https://dashboard.stripe.com/account/apikeys
\Stripe\Stripe::setApiKey("secret API key");
// Token is created using Checkout or Elements!
// トークンは、Checkout か Elementsで作成される
// Get the payment token ID submitted by the form:
// フォームから送られたトークンID取得
$token = $_POST['stripeToken'];
$charge = \Stripe\Charge::create([
    'amount' => 999,
    'currency' => 'usd',
    'description' => 'Example charge',
    'source' => $token,
]);'amount'には請求額を記載するのだが、記載額は実際の額の1/100となるので注意上でいうと、
'amount' => 999の実際の額は「USD 9.99」となる支払い画面サンプルコード
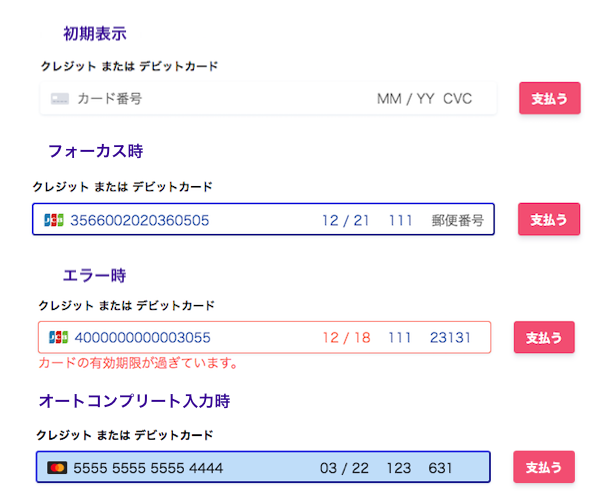
上記を踏まえ、 CSS でデザインを変えたサンプルコード
こんな支払いフォームができる
<!DOCTYPE html>
<html>
  <head>
	<meta charset="UTF-8">
	<meta name="viewport" content="width=device-width, initial-scale=1" />
	<title>sample</title>
	<script src="https://js.stripe.com/v3"></script>
	<style>
		form {
		  padding: 30px;
		  height: 120px;
		  margin-left: auto;
		  margin-right: auto;
		  width: 700px;
		}
		label {
		  font-weight: 600;
		  font-size: 14px;
		  display: block;
		  margin-bottom: 8px;
		}
		.form-row {
		  width: 80%;
		  height: 100px;
		  float: left;
		}
		/* カード情報入力欄 */
		.StripeElement {
		  box-sizing: border-box;
		  height: 40px;
		  padding: 10px 12px;
		  border: 1px solid transparent;
		  border-radius: 4px;
		  background-color: white;
		  box-shadow: 0 1px 3px 0 #e6ebf1;
		  -webkit-transition: box-shadow 150ms ease;
		  transition: box-shadow 150ms ease;
		}
		/* ボタン */
		#btn {
		  color: #fff;
		  background: #f45671;
		  display: inline-block;
		  height: 40px;
		  line-height: 40px;
		  padding: 0 14px;
		  box-shadow: 0 4px 6px rgba(50, 50, 93, .11), 0 1px 3px rgba(0, 0, 0, .08);
		  border: 1px solid transparent;
		  border-radius: 4px;
		  font-size: 15px;
		  font-weight: 600;
		  margin-top: 29px;
		  margin-left: 28px;
		}
		#btn:hover {
		  box-shadow: 0 7px 14px rgba(50, 50, 93, .10), 0 3px 6px rgba(0, 0, 0, .08);
		  background-color: #d32f38;
		}
		/* 入力欄にフォーカスされた時 */
		.StripeElement--focus {
		  border: 2px outset #263be0;
		}
		/* エラー時の入力欄枠線の色 */
		.StripeElement--invalid {
		  border-color: #ff5f3f;
		}
		/* オートコンプリートで入力した時 */
		.StripeElement--webkit-autofill {
		  background-color: #beddf9 !important;
		}
		/* 入力欄の下に出るエラーメッセージの文字色 */
		#card-errors {
			color: #ff5f3f;
		}
	</style>
  </head>
  <body>
	<form action="/hoge" method="post" id="payment-form">
	  <div class="form-row">
	    <label for="card-element">
	      クレジット または デビットカード
	    </label>
	    <div id="card-element">
	      <!-- A Stripe Element will be inserted here. -->
	    </div>
	    <!-- Used to display Element errors. -->
	    <div id="card-errors" role="alert"></div>
	  </div>
	  <button id="btn">支払う</button>
	</form>
  <script>
  	// publishable API keyをセットする
  	var stripe = Stripe('pk_live_key-----------');
	var elements = stripe.elements();
  	var style = {
	  base: {
	  	// 入力した文字のサイズ
	    fontSize: '16px',
	    // 入力した文字の色
	    color: "#1847a2",
	    // プレースホルダーの文字色
	    '::placeholder': {
	      color: '#656565'
	    }
	  }
	  // エラー時の入力した文字色と左のカードアイコンの色
	  ,invalid: {
	    color: '#ff5f3f',
	    iconColor: '#ff5f3f'
	  }
	};
	// カード要素のインスタンス生成
	var card = elements.create('card', {style: style});
	// id="card-element"の<div>タグにカード要素のインスタンスを紐付ける(mountする)
	card.mount('#card-element');
	card.addEventListener('change', function(event) {
	  var displayError = document.getElementById('card-errors');
	  if (event.error) {
	    displayError.textContent = event.error.message;
	  } else {
	    displayError.textContent = '';
	  }
	});
	// トークンの生成、またはサブミット時のエラーを表示
	var form = document.getElementById('payment-form');
	form.addEventListener('submit', function(event) {
	  // デフォルトのsubmit動作を止める
	  event.preventDefault();
	  stripe.createToken(card).then(function(result) {
	    if (result.error) {
	      // エラーがあった場合、エラーを表示
	      var errorElement = document.getElementById('card-errors');
	      errorElement.textContent = result.error.message;
	    } else {
	      // エラーがない場合、トークン送信
	      stripeTokenHandler(result.token);
	    }
	  });
	});
	function stripeTokenHandler(token) {
	  // トークンIDを付加してフォームデータをサブミット
	  var form = document.getElementById('payment-form');
	  var hiddenInput = document.createElement('input');
	  hiddenInput.setAttribute('type', 'hidden');
	  hiddenInput.setAttribute('name', 'stripeToken');
	  hiddenInput.setAttribute('value', token.id);
	  form.appendChild(hiddenInput);
	  // フォーム送信
	  form.submit();
	}
   </script>
  </body>
</html>
テスト用カード番号
Stripe には、テストモード時( API Key が ××_test_の時)に支払い動作を確認できるようテストカード番号が用意されている例えば、Visaカード(アメリカ発行)のテストなら「4242 4242 4242 4242」、日本発行のJCBは「3530111333300000」
色々と用意されているので、公式サイト(テスト用カード番号)を参照されたし